| 일 | 월 | 화 | 수 | 목 | 금 | 토 |
|---|---|---|---|---|---|---|
| 1 | ||||||
| 2 | 3 | 4 | 5 | 6 | 7 | 8 |
| 9 | 10 | 11 | 12 | 13 | 14 | 15 |
| 16 | 17 | 18 | 19 | 20 | 21 | 22 |
| 23 | 24 | 25 | 26 | 27 | 28 | 29 |
| 30 |
- Linux
- aws
- Entra ID
- cloud
- network
- 시스템 엔지니어
- SE
- 클라우드
- Exchange Online
- Microsoft
- 가상화
- 리눅스마스터1급
- It
- 그룹정책
- 네트워크
- windows
- cloud engineer
- 메일보안
- Azure
- 시트릭스
- Microsoft Azure
- Microsoft 365
- 클라우드엔지니어
- Docker
- 시스템엔지니어
- Server
- 리눅스
- windows server
- 컴퓨터
- Azure AD
- Today
- Total
Cloud System Engineer
도커 cpu 자원 할당 본문
호스트에 cpu가 여러게 있을 때 --cpuset-cpus 옵션을
지정해 컨테이너가 특정 cpu만 사용하도록 설정할수있다.
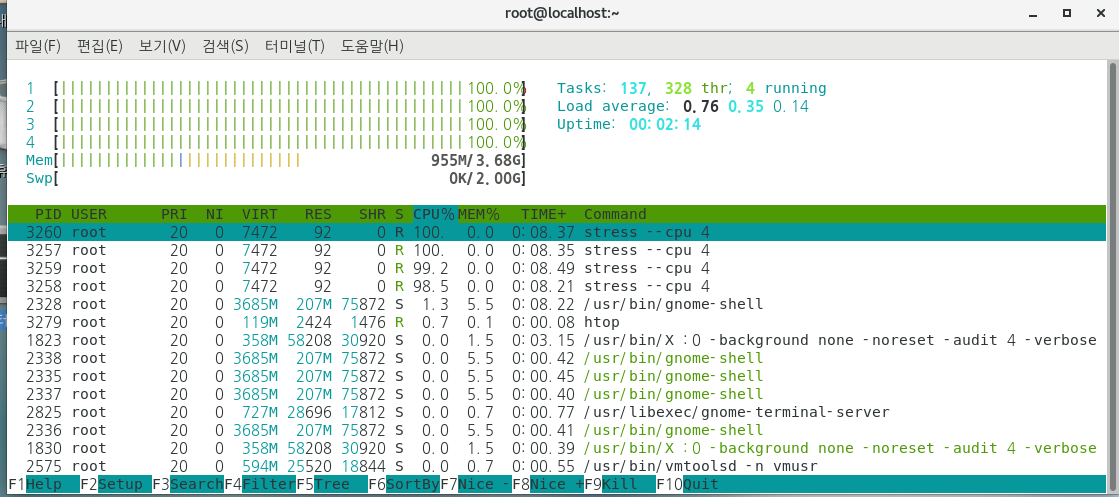
cpu 별로 사용량을 확인 할 수 있는 대표적인 도구
apt-get install htop //우분투
yum -y install epel-release && yum-y install htop //centos
htop 을 이용하여 현재 cpu 사용량을 측정할 수 있다.

#docker run -d --name cpuset_0_3 --cpuset-cpus="0-3" alicek106/stress stress --cpu 4 // 1,2,34 번째 cpu쓰겠다.

#docker run -d --name cpuset_0_2 --cpuset-cpus="0-2" alicek106/stress stress --cpu 4 // 1,2,3 번째 cpu쓰겠다.

#docker run -d --name cpuset_0_1 --cpuset-cpus="0-1" alicek106/stress stress --cpu 4 // 1,2 번째 cpu쓰겠다.

각각 1개씩 지목하여 사용
#docker run -d --name cpuset_0 --cpuset-cpus="0" alicek106/stress stress --cpu 1 // 1번 cpu 사용
#docker run -d --name cpuset_1 --cpuset-cpus="1" alicek106/stress stress --cpu 1 // 2번 cpu 사용
#docker run -d --name cpuset_2 --cpuset-cpus="2" alicek106/stress stress --cpu 1 // 3번 cpu 사용
#docker run -d --name cpuset_3 --cpuset-cpus="3" alicek106/stress stress --cpu 1 // 4번 cpu 사용
컨테이너의 CFS(completely fair scheduler) 주기는 기본적으로 100ms로 설정되지만
run 명령어의 옵션중 --cpu-period, --cpu-quota 로 주기를 변경할 수 있다.
docker run -d --name quota_1_4 --cpu-period=100000 --cpu-quota=25000 alicek106/stress stress --cpu 1
컨테이너는 --cpu-qutota 값 / --cpu-period값 만큼 cpu 시간을 할당 받는다.
-----------------------------------도커를 cpu 사용량 비교하기위함 -----------------------------------------------
#docker run -d --name quota_1_1 --cpu-period=100000 --cpu-quota=100000 alicek106/stress stress --cpu 1
3) block i/o 제한
컨테이너를 생성할 때 아무런 옵션도 설정하지 않으면 컨테이너 내부에서 파일을 읽고 쓰는 대역폭에 제한이 설정되지 않는다.
--device-read-bps, --device-write-bps 는 각기 읽고 쓰는 작업의 초당 제한을 설정하며, kb,mg,bg 단위로 제한할 수 있다.
# docker run -it -device-write-bps /dev/sda:lmb ubuntu:14.04
컨테이너id:# dd if=/dev/zero of=test.out bs=1M count=10 oflag=direct
결과
10+0 records in
10+0 records out
10485760 bytes (10 MB) copied, 10.0031 s, 1.0 MB/s
-dd:블록 단위로 파일을 복사하거나 파일 변환을 할 수 있는 명령
-if:지정한 파일을 입력대상으로 설정한다.
-of:지정한 파일을 출력대상으로 설정한다.
-bs:한 번에 읽고 쓸 최대 바이트 크기를 지정한다.
-count:지정한 블록 수 만큼 복사한다.
-oflag:쉼표로 구분된 구분목록에 따라 작성한다.
-- device-read-iops, --device-wirte-iops 에는 상대적인 값을 입력한다. 다음 예시에서 수행 시간은 서로 2배 가량 차이가 나는것을
알 수 있다.
# docker run -it --device-write-iops /dev/sda:5 ubuntu:14.04
dd if=/dev/zero of=test.out bs=1M count=10 flag=direct

# docker run -it --device-write-iops /dev/sda:10 ubuntu:14.04
dd if=/dev/zero of=test.out bs=1M count=10 flag=direct

속도 2.6 / 5.2 MB/s , 수행속도 4.00244 s/ 2.00166 s라는 결과가 나왔다 수행시간은 서로 2배 가량 차이나는것을 알 수 있다.
## 도커 이미지
도커는 기본적으로 도커 허브라는 중앙 이미지 저장소에서 이미지를 내려받는다. 도커 계정을 가지고 있다면 누구든지 이미지를
올리고 내려받을 수 있기 때문에 다른 사람들에게 이미지를 쉽게 공유할 수 있다.
단 도커 허브는 누구나 이미지를 올릴 수 있기 때문에 공식 라벨이 없는 이미지는 사용법이 제각각이다.
도커 허브에 어떤 이미지가 있는지 확인하기 위해 도커 허브 사이트를 직접 접속해서 찾아볼 수 있지만,
도커 엔진에서 docker serch 명령어를 사용할 수도 있다.
#docker search ubuntu

도커 이미지 생성
특정 개발 환경을 직접 구축한 뒤 사용자만의 이미지를 직접 생성해야 할 경우, 컨테이너 안에서 작업한 내용을 이미지로 만들어보자
# docker run -i -t --name commit_test ubuntu:14.04
이제 컨테이너를 이미지로 만든다 . 문법은 다음과 같다.
#docker commit [옵션] contatiner [repository][:tag]]
다음명령은 commit_test라는 컨테이너를 commit_test:first 라는 이름의 이미지를 생성한다.
docker commit -a "jyjung1057" -m "myfirst commit" commit_test commit_test:first
-a author 를 뜯하며, -m 은 이미지에 포함될 부가설명을 뜻한다.
commit_test:second라는 이미지를 새롭게 생성한다.
docker run -i -t --name commit_test2 commit_test:first
docker commit -a "jyjung1057" -m "my second coomit" commit_test2 commit_test:second
[root@localhost ~]# docker images
REPOSITORY TAG IMAGE ID CREATED SIZE
commit_test second bbaf309eb1e2 5 seconds ago 197MB
commit_test first 433883df0813 16 minutes ago 197MB
이미지 생성됨
docker inspect ubuntu:14.04
docker inspect commit_test:first
docker inspect commit_test:second
차이점
전체 이미지의 실제 크기는 197MB+first 파일의 크기 + second 파일의 크기이다.
[root@localhost ~]# docker images
REPOSITORY TAG IMAGE ID CREATED SIZE
commit_test second bbaf309eb1e2 10 minutes ago 197MB
commit_test first 433883df0813 26 minutes ago 197MB
ubuntu 14.04 df043b4f0cf1 4 months ago 197MB
아이디 삭제
docker rmi stop commit_test2 && docer rm commit_test2
#docker rmi commit_test:first 또는 이미지 ID
컨테이너가 사용중인 이미지를 docker rmi -f 로 강제로 삭제하면 이미지의 이름이 <none> 으로변경되며 ,
이러한 이미지를 댕글링(dnagling)이미지 라고 한다.
댕글링 이미지는 다음과 같이 별도로 확인할 수 있다.
#docker images -f dangling=ture
commit_test:second 이미지 삭제
docker rmi commit_test:second
'리눅스 > docker' 카테고리의 다른 글
| 도커 swarm (0) | 2021.02.05 |
|---|---|
| 도커 이미지 배포 (0) | 2021.02.03 |
| 컨테이너 자원 할당 제한 (0) | 2021.01.31 |
| 컨테이너 로깅 (0) | 2021.01.31 |
| MAC VLAN 네트워크 (0) | 2021.01.29 |


